This chapter contains the following topics:
Introduction to Vendor History
Vendor History retains information about posted transactions after they have been purged from other A/P files/tables.
If you have unchecked the box to the field Keep vendor history in Control information, this chapter does not apply to you.
Keeping vendor history lets you void checks more readily. It also allows you to view and report on previous vendor activity.
This chapter explains several reports, how to inquiry into Vendor History and the purging of selective vendor history information.
|
Note |
In this chapter, the term activity for a vendor invoice refers to all payments made against the invoice, and associated credit / debit memos. |
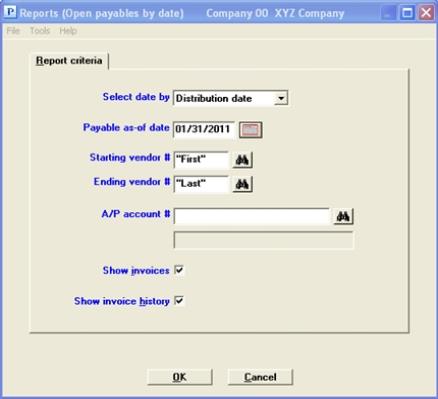
This report shows the payables that were open (not fully paid) as of a selected distribution or vendor invoice date. You can print with or without vendor history details, and can restrict the report by vendor or account number.
Select
Select Open payables by date from the Reports menu.
The following screen appears:
Graphical Mode
Character Mode
Enter the following information:
The date range is selectable by distribution date or vendor invoice date. Select the range to be by Distribution date or Vendor invoice date.
| Character Mode | Graphical Mode | Description |
|
D |
Distribution date |
For the distribution date. |
|
V |
Vendor invoice date |
For the vendor invoice date. |
|
Format |
Drop down list. Select either Distribution date or Vendor invoice date |
|
Example |
Select Distribution date |
Enter the payable as-of date. Items that were not paid or were only partially paid on this date will be included on the report; those that were fully paid will not be.
You may use the date selector to help you find a date. To access the date selector in graphical mode click on the calendar button or select <F4>. In character mode select <F7>.
|
Format |
MMDDYY The default is the system date (today). |
|
Example |
Type 63005 |
Starting vendor #
Ending vendor #
Options
Enter the range of vendor numbers to be included on the report, or use the option:
|
<F2> |
For the First starting vendor number or Last ending vendor number |
Neither field is required to be a valid vendor number, but the range should enclose at least one vendor.
|
Format |
6 characters for each field |
|
Example |
Press <F2> at each field |
Options
Enter the A/P account number that you want to restrict the report to. This must be an existing entry in A/P accounts. You may use one of the options:
|
<F1> |
For the next entry in A/P accounts. If there is only one entry, the <F1> and <SF1> options do not appear. |
|
<SF1> |
For the previous entry |
If you choose to show "All" A/P accounts, vendors are grouped within A/P account and subtotals are shown for each A/P account. This allows the report to be used to cross-check the amount in each A/P account in General Ledger.
Otherwise, invoices are grouped by vendor.
|
Format |
Your standard account number format, as defined in Company information |
|
Example |
Press <F5> |
Leave this box checked if you want to show invoices. Uncheck this box if you want a summary only.
|
Format |
Graphical mode: Checked for yes and unchecked for no. The default is checked Character mode: Y or N. Y is the default |
|
Example |
Select <Enter> for the default |
This field may not be entered if you unchecked the Show invoices field.
Otherwise, leave the box checked to show detail for each invoice (payments, void checks, credit memos, and debit memos). Uncheck the box to show only the invoices.
|
Format |
Graphical mode: Checked for yes and unchecked for no. The default is checked Character mode: Y or N. Y is the default |
|
Example |
Select <Enter> for the default |
Make any needed changes. Select OK to print the Open Payables by Date Report. See an Open Payables by Date report example in the Sample Reports chapter.
Invoices or vendors with a zero balance on the as-of date will not be printed on the report. Grand totals are printed at the end of the report.
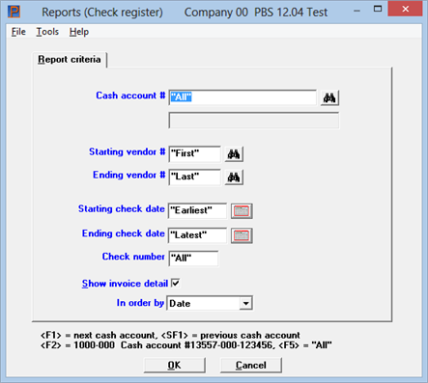
This report prints out all or individual A/P checks by cash account, for specified vendors within a selected date range, in date or check number order. It shows all computer, direct deposit, non-A/P, manual, and voided checks and payments. Void checks due to skipped check numbers are not shown.
As check registers are always printed when checks are posted, this report is a supplementary or consolidated report, not a true audit-trail register. For this reason you are not required to print out a hard copy, and may direct the register to the screen.
Select
Check register from the Reports menu.
Graphical Mode:
The following screen will appear:
Character Mode
A screen similar to this will appear.

Options
Enter the cash account number. This must be a valid entry in the System Control (CTL) Cash accounts selection. You may use one of the options:
|
<F1> |
For the next entry in Cash accounts. If there is only one entry, the <F1> and <SF1> options do not appear. |
|
<SF1> |
For the previous entry |
|
<F2> |
For the default cash account from A/P Control information |
|
<F5> |
For All checks regardless of cash account |
|
Format |
Your standard account number format, as defined in Company information |
|
Example |
Press <F5> |
If you choose to show All cash accounts, checks are grouped by cash account with subtotals for each cash account. Each new cash account starts on a new page. This allows a monthly check register to be printed for all cash accounts.
Starting vendor #
Ending vendor #
Options
Enter the range of vendors you wish to include on the check register.
|
<F2> |
For the First and Last vendor |
|
<Enter> |
For vendor number entered in field 2 |
|
Format |
Up to 6 characters |
|
Example |
Press <F2> at each field |
Starting check date
Ending check date
Options
Enter the range of dates you wish to include on the check register. The program does not check that these dates are earlier than the cut-off date of your latest purge. You may use the option:
|
<F2> |
For the Earliest starting date or Latest ending date |
|
Format |
MMDDYY for each field. If the starting date was the first day of a calendar month, the default for the ending date is the ending day of the same month; otherwise the default for the ending date is the same date as the starting date. |
|
Example |
Press <F2> at each field |
Options
Enter a check number for printing information for only one check. You may enter any number, however the program will only find a check if it exists in history. You may use the option:
|
<F5> |
For "All" checks regardless of check number |
|
Format |
6 numeric |
|
Example |
Press <F5> for "All" checks |
Check this box, or enter Y, to show each voucher paid by each check. Uncheck, or enter N, it to show a single summary line for each check, with no voucher details.
|
Format |
Graphical: Check box where checked is yes and unchecked is no. The default is checked Character: Enter Y or N |
|
Example |
Select the <Enter> key for the default |
Select Date to print in order by Date or Check number to print in Check number order.
|
Format |
Graphical mode: Drop down list Character mode: D for Date or C for Check number |
|
Example |
Select the <Enter> key for the default |
Make any needed changes. Select OK to display the printer selection window or Cancel to not print and return to the menu.
While in character mode, from "Field number to change ?" make any changes. Hit the Enter key to display the printer selection window.
This report prints out all vendor history information, regardless of whether an invoice is open or not. It usually contains more detail than Open payables by date.
Invoices are grouped by vendor and can be restricted to a specific vendor or range of vendors.
This report can be printed for vendors having a specific A/P account or belonging to a specified payment group.
Names of temporary vendors are also printed on the report. The use of Temporary vendors are explained in the Vendors chapter.
Invoice and discount totals are provided.
Void checks, with no assigned vendors, do not print. These type of voids occur after voiding checks during the Print checks and post process.
If you choose to print memo details on this report there is a separate grand total for memos.
The types that could print on the report include:
| Type | Description |
|
Invoice |
The original invoice entered in Payables. |
|
Cancellation |
This is a canceled invoice. |
|
Computer chk |
An A/P check only. |
|
Computer-POS |
An A/P check written to a positive pay file. |
|
Computer-ACH |
An A/P payment written to the direct deposit ACH file. |
|
Voided check |
A voided check, voided positive pay check or voided ACH payment. |
|
Manual chk |
A manual check. |
|
Non-A/P check |
A non-A/P check. |
|
Memo |
A memo transaction. |
Select
Vendor history from the Reports, vendor menu.
See a sample Vendor History report in the Sample Reports appendix.
The following screen appears:
Graphical Mode
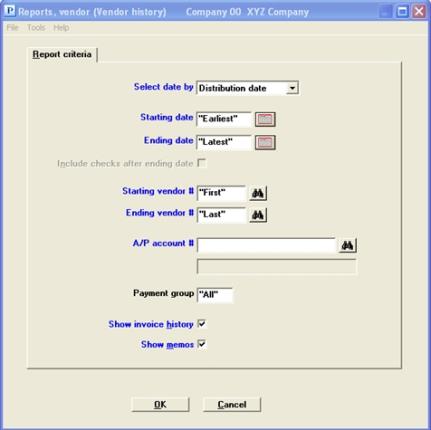
Character Mode
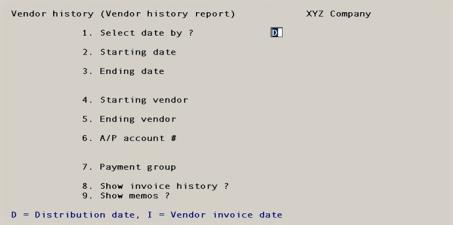
Enter the following information:
The date range in the Starting date and Ending date fields are enterable as distribution dates or vendor invoice dates. Enter one of the following:
| Character Mode | Graphical Mode | Description |
|---|---|---|
|
D |
Distribution date |
For a distribution date range. |
|
V |
Vendor invoice date |
For a vendor invoice date range. |
|
Format |
Drop down list |
|
Example |
Select Distribution date |
The starting and ending dates enable you to specify a date range that will be included on the report. The program does not check that these dates are earlier than the cut-off date of your latest purge.
Enter a date or use the option:
|
<F2> |
For the Earliest starting date in vendor history |
|
Format |
MMDDYY The default is the current system date. |
|
Example |
Press <Enter> |
All invoices before or on this date will be included on the report.
Options
Enter a date or use the option:
|
<F2> |
For the Latest date |
|
Format |
MMDDYY The default is the current system date |
|
Example |
Press <F2> |
Include checks after ending date
This field cannot be entered if the Ending date field is "Latest".
Check this box to print the check, ACH Payment and void associated with the vendor and invoice. If you leave it unchecked, only checks, payments and voids that fall in the date range will print.
If you selected to print by Distribution date and the invoice has a cancellation that has a later distribution date than the Ending date, the cancellation will also print on the report.
Void checks, with no associated vendor, do not print on the report.
|
Format |
Graphical mode: Check box where checked is yes and unchecked is no. The default is unchecked Character mode: Enter Y or N. The default is Y |
|
Example |
Press the space bar to include checks after ending date |
Options
Enter the range of vendor numbers to be included on the report, or use one of the options:
|
<F1> |
For the next vendor |
|
<SF1> |
For the previous vendor |
|
<F2> |
For the First starting vendor number or Last ending vendor number |
|
Format |
6 characters for each field |
|
Example |
Press <F2> for each field |
Neither field is required to be a valid vendor number, but the range should enclose at least one vendor.
Enter the A/P account number that you want to restrict the report to. This must be an existing entry in A/P accounts.
This field is required even if only one vendor has been entered in Fields #4 and 5.
You may use one of the options:
|
<F1> |
For the next entry in A/P accounts. If there is only one entry, the <F1> and <SF1> options do not appear. |
|
<SF1> |
For the previous entry |
|
<F2> |
For the default A/P account from Control information |
|
<F5> |
For All items regardless of A/P account |
|
Format |
Your standard account number format, as defined in Company information |
|
Example |
Press <F5> |
If you choose to show All A/P accounts, vendors are grouped within A/P account. Otherwise, invoices are grouped by vendor.
This field is required even if only one vendor has been entered in Fields #4 and 5.
Options
Enter the payment group of the vendors whose items are to be included in the report, or use the option:
|
<F5> |
To select All items regardless of which payment group (if any) the vendor belongs to. |
|
Format |
3 characters |
|
Example |
Press <F5> |
Selection is on the basis of the vendor’s current payment group. If you have moved a vendor from one payment group to another, his items prior to the change will still be selected.
You may leave this field blank, in which case items will be purged only for those vendors who do not belong to any payment group.
If you don't show invoice history, the report will print one summary line for each invoice. If you do show invoice history, one line will print for each activity of each invoice, in addition to the invoice summary line.
If a pay-to address is used for a payment, the pay-to number and name prints on the report when Show invoice history is selected and when a payment has been made to the invoice. For more information on pay-to addresses see Pay-to Addresses in the Vendors chapter.
|
Format |
Graphical mode: Check box where checked is yes and unchecked is no. The default is checked Character mode: Enter Y or N. The default is Y |
|
Example |
Select <Enter> for the default |
If you are not using memos on your A/P system, as designated in the A/P Control information Use memo tracking field, this field will have no bearing on the report.
If you are using memo transactions leave the box checked to show them on the report or uncheck the box to not show them.
Only posted memos will print on the report.
|
Format |
Graphical mode: Check box where checked is yes and unchecked is no. The default is checked Character mode: Enter Y or N. The default is Y |
|
Example |
Select <Enter> for the default |
Make any needed changes. Select OK to print the Vendor History Report or you may select Cancel and the report will not be printed.
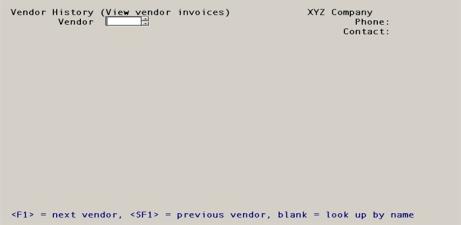
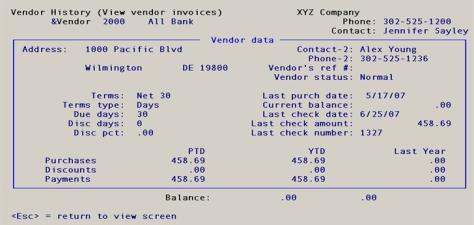
The selection lets you examine the full history of any particular invoice, whether it is open or not. This selection is not meant for entering any data (except notes), nor for printing anything.
Select
Select View vendor invoices from the A/P menu.
Before you select a vendor, the screen will look like the following:

|
Exit |
Alt+x |
To exit the screen. You may also use the <Esc> key |
Within the upper list box you have the following options to locate an existing invoice:
Invoices, vouchers, checks and memos that display in the list box are available for viewing only. The fields for the selected document display in the lower part of the screen.
The list box displays up to 6 historical documents at a time. The data for the selected document displays in the fields below. The selected document and any associated documents display in the lower list box.
The list boxes offer search options. To locate a record , start typing a number or date depending on which sort field is selected. You may also use the up/down arrows, Page up, Page down, Home and End keys to locate an item. The <F1> and <SF1> keys are the same as the up/down arrow keys.
You may search on different columns. Only column names in red may be sorted. To change the sort order or sort field, click on the column name or the arrow to the right of the column name or use the View menu options.
There is a lookup to the right of the vendor number column. You may also use this lookup to find a voucher by vendor number or vendor name. You may also select the <F8> key to launch the window. If there is no data in history for the selected vendor, the lower list box displays history for the closest vendor found.
The default sort is by vendor number. If you have any void checks on file it displays them first as void transactions do not have a vendor number. Voids without a vendor number are generated during Print checks and post, when you indicate that the checks did not print okay. It can also occur after printing an immediate invoice in Payables, also when indicating the check did not print okay. Voids from immediate printing do not have an invoice date, where voids from Print checks and post do.
Within the list box you have two options for finding a document. Initially the list box allows you to locate a document from all the available documents in history. Optionally, you may locate a document for a single vendor. Both are explained below:
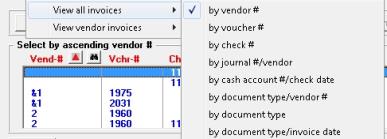
View All Invoices
This view allows you to search through all the invoices in history. You may sort and search the history by vendor number, voucher number, journal number, check number, cash account number or document type; all in ascending or descending order. The options look like this:
View Vendor Invoices
Once you have found a vendor, you may view records just for that vendor. First select the View menu. Then select View vendor invoices and finally select one of the options from this menu:
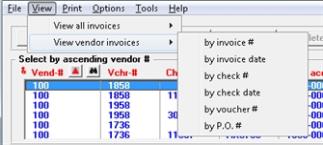
When you start typing it searches through documents for only the selected vendor. You may sort and search the selected vendor's history by invoice number, invoice date, check number, check date, voucher number or purchase order number; all in ascending or descending order. When you click on the sortable fields it sorts in ascending and descending order for invoices and checks only for the selected vendor.
Pay to
If a pay-to address is used for a payment, the pay-to number and name displays on the view screen. For more information on pay-to addresses, see Pay-to Addresses in the Vendors chapter.
The lower list box contains the documents associated with the invoice or check selected in the upper list box.
|
Note |
Prior to PBS v12.04, all voided checks were written to history with no vendor number and no voucher number. After upgrading from 12.03 or earlier to any more recent version, your older history will still reflect this. Initially, without selecting any sorting, they display at the top of the list box. Checks that are voided during a check run (Print checks and post) are still written to history with no vendor number and no voucher number. The reference is written as Voided at check run. For voids posted in 12.04 or later using the Void checks menu selection, a void record is written to history with the original check being retained. The original vendor and voucher number is being written to the void record. |
Vendor Info
At any time you may select the Vendor info tab. See the Vendor info section below.
Distribution history provides a list of the accounts, amounts, journal number and the distribution date associated with the voucher selected on the main View vendor invoices screen. The fields display the associated invoice number and check number.
|
Note |
There is no distribution history after upgrading from an older system. PBS 11.7.9 and earlier versions, as well as RealWorld, do not have a distribution history. When there is no history, the View distribution history button will be grayed and unavailable. When you start posting new payables and printing checks the distribution history for those transactions can be viewed. |
Select
the View distribution history button.
A screen similar to the following will display:
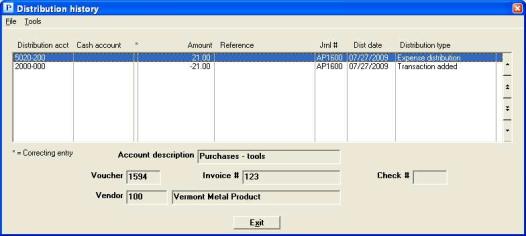
Each row in this list box represents a single G/L account entry. The details for the entry display in the fields at the bottom of the screen.
Options
One screen can accommodate ten account entries and you can view more items with the function keys. Select the account entry you wish to view. You may use one of the options:
|
<F1> or Down arrow |
For the next account entry |
|
<SF1> or Up arrow |
For the previous account entry |
|
<Page Down> |
To move to the next group of account entries |
|
<Page Up> |
To move to the previous group of account entries |
|
End |
To move to the last account entry |
|
Home |
To move to the first account entry |
Columns
The columns are:
Distribution acct
This is the valid G/L account number.
Cash account
This is the cash account number. If there was no cash posted with the voucher, this field will be empty.
*
Indicates a correcting entry.
Amount
This amount of the distribution.
Reference
This is the reference for the distribution.
Jrnl #
This is the due date.
Dist date
This is the date of the distribution.
Distribution type
This is the type of distribution.
The distribution types are:
| Type | Description |
|---|---|
|
Expense Distribution |
An expense distribution |
|
Transaction Added |
The vendor G/L account number |
|
Check Amount Paid |
The Cash account |
|
Discount Taken |
Discount taken on the invoice |
|
Paid |
The offsetting vendor account and cash account |
Fields
The fields at the bottom of the window are:
Account description
This description of the account
Voucher
This is the voucher number
Invoice #
This is the invoice number associated with the distribution.
Check #
This is the check number. It will be populated when it was an immediate invoice.
Vendor
This is the number associated with the distribution.
(Vendor name)
This is the vendor name associated with the distribution.
When finished viewing the distribution history, select the <Esc> key or click on the Exit button.
Memos may be entered and assigned to vouchers if the Use memo tracking field in the Control information was checked. For more information on memo tracking see the Control information chapter.
If there are memos assigned to the voucher, a separate tab will appear where you can view them. Memos can only be viewed in the main entry is an invoice type.
To view the assigned memos, select the pay-to vendor, select the voucher and the memo tab will display similar to the following:
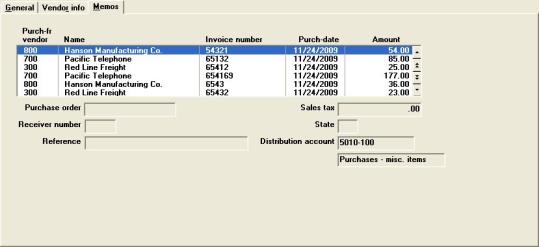
Fields
The fields in the list box and at the bottom of the window are:
Purch-fr vendor
The purchase from vendor assigned to the memo.
Name
The purchase from vendor name.
Invoice number
This is the invoice number associated with the purchase from vendor.
Purch-date
This is the date that when the purchase was made.
Amount
The purchase from amount.
Purchase order
This is the purchase from purchase order number.
Receiver number
This is the receiver number associated with the purchase order.
Sales tax
This is state sales tax.
State
This is the state the sales tax is associated with.
Distribution account
This is the distribution account used when the memo was entered or assigned in payables.
Select the Vendor info tab to view information about the vendor. When selected it looks something like the following:
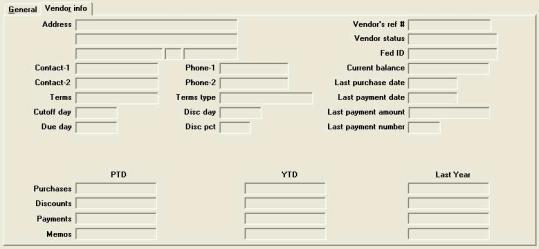
There are separate view screens. One is for the standard invoices and another for memo invoices. A standard invoice is one that has been paid with a check or ACH payment and a memo invoice was paid with a credit card or through some other means.
See Memo Invoice - Character Mode for information on the memo invoice screen. If you are not using the memo feature as determined by a setting in the A/P Control information, there will not be any memo records to view.
In character mode this screen appears:
Enter the following information:
Options
Enter a vendor number, or use the option:
|
<F8> |
To find a vendor via the lookup. |
|
Format |
6 characters |
|
Example |
Type 500 |
The vendor number may be a temporary vendor, in which case it begins with an asterisk.
When vendor number is left blank, the cursor moves to the vendor name field. Enter the vendor name, or just the leading characters. Upper / lower case is significant. Entries made under a personal rather than corporate name are searched for by surname.
Options
You may also use one of the options:
|
<F1> |
For the next vendor in vendor name sequence |
|
<SF1> |
For the previous vendor |
|
Blank |
To return to vendor lookup by number |
|
Format |
25 characters |
|
Example |
(Does not occur in this example) |
Next enter an invoice number, or use one of the options:
|
<F1> |
For this vendor’s next invoice |
|
<SF1> |
For this vendor’s previous invoice |
|
Format |
15 characters |
|
Example |
Press <F1> then press <enter> |
After you enter the vendor number, invoice number and select the Enter key the display will be different if you are viewing a standard invoice vs. a memo invoice. The display of a standard invoice is documented next and a memo invoice is later in this chapter.
Information about the selected standard invoice and each item of the invoice now displays:
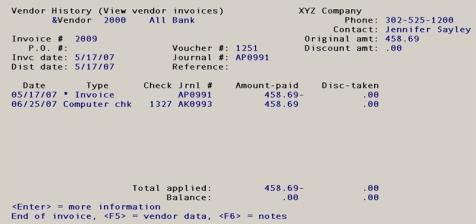
An ampersand ( & ) next to the vendor number indicates that there is a note entered for this vendor.
Each row in this table represents a single transaction for this invoice, in chronological order. One screen can accommodate ten such items; if an invoice has more than this the screen does not scroll but you can page up or down as needed. An invoice total appears following the last item.
The columns are:
Date
This is the date of the transaction.
Type
This identifies the transaction. Payables transactions are identified by a type code corresponding to that entered in Payables. Payments are identified as computer checks, computer-ACH or manual checks; modifications are identified as such, and so on.
Check
This is the check number and is present only on check transactions. In the case of an ACH payment it is the transaction number and has the letter “T” to the right of the number.
Amount-paid
This is the amount of the transaction.
Discount taken
This is the discount taken.
Retainage
This is the retainage paid. This column only appears if you are interfaced to Job Cost.
Options
Select from the following options:
|
<F1> |
For the next page of items for this invoice (if there is one) |
|
<F2> |
For the previous page of items for this invoice (if there is one) |
|
<F5> |
To see more information about this vendor (details below) |
|
<F6> |
To view or enter notes for this vendor. For details, refer to the Using Notes section in the Use of Function Keys, Tool Bar and Windows chapter of the System User documentation |
|
<Enter> |
To display more information about the items (details below) |
|
<Esc> |
To clear the screen of this invoice’s items, and return the cursor to the Vendor field for selection of a different vendor |
For more information on the vendor rather than the invoice, press <F5>. This opens a window as follows:
An ampersand ( & ) next to the vendor number indicates that there is a note entered for this vendor.
More information about the open items
For more information on the invoice items shown you can press <Enter>. This controls what appears in the rightmost portion of the screen. Each time you press <Enter> you cycle between two formats. Specifically, the number and name of the cash account replace all columns to the right of the check number.
Notes
If you press <F6>, you may see or enter notes about the vendor.
You may have any number of dated notes for a vendor. For details on entering notes, refer to the Using Notes section of the Use of Function Keys, Tool Bar and Windows chapter in the System User documentation.
|
Format |
10 lines of 77 characters each |
|
Example |
(Does not occur in this example) |
After you enter the vendor number and the invoice number the information about the memo invoice displays.
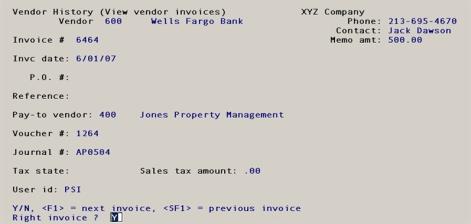
In addition to the vendor number and invoice number the fields that display are:
Memo amt:
This is the amount of the transaction.
P.O. #
This is the purchase order number for the memo.
Reference
This is the reference that was entered at the time the memo was entered.
Pay-to vendor:
This is the vendor to which the memo was assigned.
Voucher #:
This is the voucher number that matches the pay-to vendor record in history.
Journal #:
This is the journal number that matches the pay-to vendor record in history.
Tax state:
This is the state to which the sales tax was paid.
Sales tax amount:
This is the amount of the sales tax.
This question displays at the bottom of the screen:
Right invoice?
Select Y if it is the right invoice and N to take you back to the vendor number field.
Options
When you select Y you have additional options from which to select:
|
<F1> |
To reselect the vendor |
|
<F5> |
To see more information about this vendor (details above) |
|
<F6> |
To view or enter notes for this vendor. For details, refer to the Using Notes section in the Use of Function Keys, Toolbar and Windows chapter of the System User documentation. |
|
<Esc> |
To clear the screen of this invoice’s items, and return the cursor to the Vendor field for selection of a different vendor |
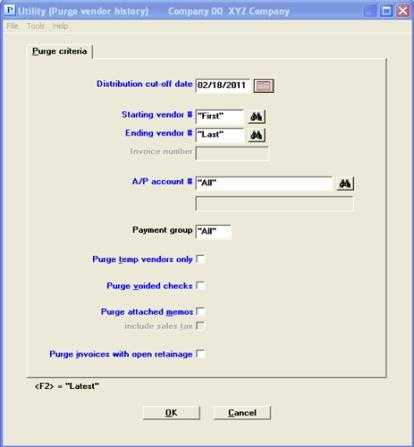
This selection provides a way for information to be selectively removed from Vendor History.
Vendor History records can be purged for a single vendor, a single invoice, a range of vendors, vendors having a particular A/P account, and vendors belonging to a specified payment group. You can also specify that only temporary vendors are to be purged.
This will purge :
| • | Paid vouchers and any associated memo records |
| • | An unpaid voucher as long as it has an associated cancellation |
| • | Paid checks and associated vouchers |
| • | Paid checks and associated vouchers with voids only if the vouchers were re-paid. |
It will not purge a voucher that was paid and the payment was voided.
Do not confuse this purge with the purge of open items.
Purging history records for items that are still stored in Open Items will cause fully paid items to print on the aged open item report, even when selecting to not show fully paid vouchers. Therefore to keep both in sync, purge your matching open items when purging history. See the Purge Open Items chapter for more information on the relationship of history to open items.
Purging is not allowed when any unposted void check transactions are pending.
|
Note |
When you are using the Check Reconciliation (C/R) module, Vendor History data is used to transfer your A/P checks to your checkbook. Therefore, be certain you have transferred the data before you purge. Your system could be setup to post to C/R automatically. If this is the case, the data would already be transferred. For more information on the setup and transfer of payables to C/R, refer to the Control Information and Transfer Checks / Deposits chapters of the C/R User documentation. |
Select
Purge vendor history from the Utility menu.
View a Purge Vendor History example in the Sample Reports appendix.
The following screen appears:
Graphical Mode
Character Mode
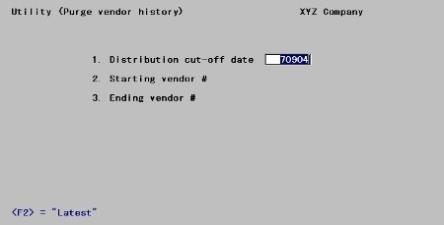
Using character mode, initially only Fields #1 through 3 appear.
Enter the following information.
Distribution dates are compared to this cut-off date. In order for an invoice or any of its activity to be purged, its balance must be zero and all its activity must have occurred on or before this cut-off date.
An invoice could have a matching cancellation. If the invoice date falls within the cut-off date and the cancellation does not, the program will remove the cancellation regardless.
Options
Enter the cut-off date or use the following option:
|
<F2> |
For the Latest (most recent) date in Vendor History. All invoices for the vendors selected will be purged. |
|
Format |
MMDDYY The default is the current system date. |
|
Example |
Press <F2> |
Starting vendor #
Ending vendor #
Options
Enter the range of vendor numbers to be purged, or use the option:
|
<F2> |
For the “First” starting vendor number or “Last” ending vendor number |
Neither field must be a valid vendor number, but the range should enclose at least one vendor.
|
Format |
6 characters for each field |
|
Example |
Press <F2> at each field |
If you have entered a single vendor (i.e., Starting vendor # and Ending vendor # fields are the same), continue as shown below. If you have entered a range of vendors, continue at Purging History for Multiple Vendors .
This field can only be entered if one vendor is selected.
Options
Enter the invoice number to purge, or use the option:
|
<F5> |
To purge "All" this vendor’s invoices |
|
blank |
See explanation for (blank) in paragraph below. |
|
Format |
15 characters |
|
Example |
Press <F5> |
You may leave this field blank, which purges only those transactions for this vendor which do not have an invoice number. All payable types except adjustments require an invoice number.
Purge unassigned voided checks
Using character mode this is field number 6 when using Job Cost with retainage. Otherwise the field number is 5. If the starting and ending vendor numbers are not the same, it is field number 7.
Check this box if you only want to purge unassigned voided checks only. An unassigned voided check means that a vendor was not assigned to the record. This occurs when posting voided checks generated during a check run, Print checks and post. I can also happen when voiding an immediate check using Payables.
When you select this option it purges all the unassigned void checks regardless of your parameters for the vendor.
This field has no affect on voids that were created with the Void checks (Post) selection. These will only be purged when the original voucher has been selected, it is fully paid and it falls within the other parameters.
Uncheck this box to only purge paid or canceled invoices for both regular and temporary vendors.
|
Format |
Graphical: Check box where checked is yes and unchecked is no Character: Enter Y or N |
|
Example |
Select <Enter> for the default of unchecked |
Purge invoices with open retainage
This field only appears if you are interfaced with Job Cost and when using payables retainage. In character mode it is field 5 or field 9 depending on how other fields are selected.
An invoice may be fully paid, but associated with it there may be an open retainage amount which has not been paid. If you were to purge such an invoice you would lose the fact that there is an open retainage amount.
If this is how you keep track of open retainage amounts, press <Enter> for unchecked. Fully paid invoices with open retainage amounts will not be purged.
If you track open retainage amounts some other way, check this box. Fully paid invoices with open retainage amounts will be purged.
|
Format |
Check box where checked is yes and unchecked is no. The default is unchecked |
|
Example |
Press <Enter> for the default |
If you selected more than one vendor in the Starting vendor # and Ending vendor # fields, the following fields will appear:
This field only appears if more than one vendor is selected.
Options
Enter the A/P account number to be included in the purge. This must be an existing entry in A/P accounts. You may use one of the options:
|
<F1> |
For the next entry in A/P accounts. If there is only one entry, the <F1> and <SF1> options do not appear. |
|
<SF1> |
For the previous entry |
|
Format |
Your standard account number format, as defined in Company information |
|
Example |
Press <F5> |
This field only appears if more than one vendor is selected.
Options
Enter the payment group of the vendors whose items are to be included in the purge, or use the option:
|
<F5> |
To select All items regardless of which payment group (if any) the vendor belongs to. |
Selection is on the basis of the vendor’s current payment group. If you have moved a vendor from one payment group to another, his items prior to the change will still be selected.
You may leave this field blank, in which case items will be purged only for those vendors who do not belong to any payment group.
|
Format |
3 characters |
|
Example |
Press <F5> |
This field can be entered only if more than one vendor is selected.
Check this box if you only want to purge temporary vendors from Vendor History.
Leave it unchecked to purge transactions for both regular and temporary vendors.
For a checked box to be meaningful, the Starting vendor # field must either be First or must begin with an asterisk. All temporary vendor numbers begin with an asterisk .
|
Format |
Check box where checked is yes and unchecked is no. The default is unchecked |
|
Example |
Press <Enter> |
Purge unassigned voided checks
See Purge unassigned voided checks
This field can be entered only if more than one vendor is selected.
This field may not pertain to your system if you have selected to not use memo tracking as determined in A/P Control information.
This selection allows you to purge memos that are associated with a fully paid voucher that is being purged.
|
Format |
Check box where checked is yes and unchecked is no. The default is unchecked |
|
Example |
Cannot be entered with this example |
Memo records can be used for tracking sales tax. This field may not pertain to your system if you have selected to not use memo tracking as determined in the A/P Control information. If you entered a sales tax amount in the memo then it applies.
This selection allows you to retain sales tax memo records while you purge non sales tax memo records.
|
Format |
Check box where checked is yes and unchecked is no. The default is unchecked |
|
Example |
Press <Enter> |
Purge invoices with open retainage
See Purge invoices with open retainage
Make any needed changes. Select OK to purge or Cancel to not purge.
Are you sure?
Answer No to return to the screen.
Answer Yes to continue with the purge. There will be a period of processing as records are deleted. A Purge Vendor History Report is printed. A purging program cannot be canceled. It must proceed to completion.
If you are not using memo tracking, this report will not have data to access.
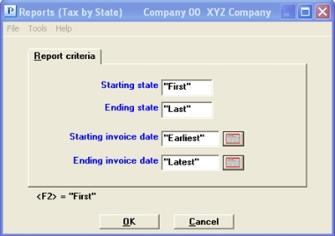
This report prints memo history information providing tax paid totals and tax amounts. Tax amounts are grouped together by state with totals per state and with a grand total at the end. Invoice number and invoice totals are provided.
Select
Tax by state from the Reports menu.
The following screen appears:
Graphical Mode
Character Mode
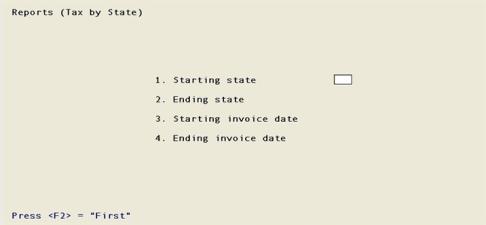
Enter the following information:
Options
Enter the range of states to be included on the report, or use one of the options:
|
<F2> |
For the First starting state or Last ending state |
|
Format |
2 characters for each field |
|
Example |
Press <F2> for each field |
Neither field is required to be a valid state number, but the range should enclose at least one state.
The starting and ending dates enable you to specify a date range that will be included on the report.
Enter a date or use the option:
|
<F2> |
For the Earliest starting date in vendor history |
|
Format |
MMDDYY The default is the current system date. |
|
Example |
Press <Enter> |
All memos on or before this date will be included on the report.
Options
Enter a date or use the option:
|
<F2> |
For the Latest date |
|
Format |
MMDDYY The default is the current system date. |
|
Example |
Press <F2> |
Make any needed changes. Select OK print the Tax by State report or select Cancel to not print.